TeX Live を Ubuntu に(APT を使わずに)導入する

Ubuntu 環境に TeX Live を導入するには APT (Advanced Package Tool) を使う方法と TeX Live が提供する install-tl を使う方法がある。
前者の場合は,他のパッケージと同様に統一的な管理ができますが,ディストリビューションによっては提供されているパッケージのバージョンが古いことがあります.後者の場合は,パッケージ管理システムによる管理からは外れてしまいますが,tlmgr を使って最新の状態にアップデートし続けることが可能です.
なかなか悩ましい選択だが,今回は install-tl を使って導入と運用をしてみよう。
なお,対象は TeX Live 2018 で(2019 はまだリリースされていない)。
TeX Live 2018 のインストール
今回は初めてのインストールなので関係ないが,以前の環境があれば削除しておく。
$ rm -rf /usr/local/texlive/2018
$ rm -rf ~/.texlive2018
ダウンロードページから install-tl-unx.tar.gz をダウンロードし中身を展開する。
その後 install-tl を管理者権限で起動する。
$ tar xvf install-tl-unx.tar.gz

$ ls install-tl*
install-tl-unx.tar.gz

install-tl-20190227:
LICENSE.CTAN  LICENSE.TL  install-tl  release-texlive.txt  texmf-dist  tlpkg

$ cd install-tl-20190227

$ sudo ./install-tl
ミラーサイトのリポジトリを使うなら
$ sudo ./install-tl --repository http://mirror.ctan.org/systems/texlive/tlnet/
とするらしい(後で気がついた)。
起動直後の画面はこんな感じ。
======================> TeX Live installation procedure <=====================

======>   Letters/digits in <angle brackets> indicate   <=======
======>   menu items for actions or customizations      <=======

 Detected platform: GNU/Linux on x86_64

 <B> set binary platforms: 1 out of 17

 <S> set installation scheme: scheme-full

 <C> set installation collections:
     40 collections out of 41, disk space required: 5806 MB

 <D> set directories:
   TEXDIR (the main TeX directory):
     !! default location: /usr/local/texlive/2018
     !! is not writable or not allowed, please select a different one!
   TEXMFLOCAL (directory for site-wide local files):
     /usr/local/texlive/texmf-local
   TEXMFSYSVAR (directory for variable and automatically generated data):
     /usr/local/texlive/2018/texmf-var
   TEXMFSYSCONFIG (directory for local config):
     /usr/local/texlive/2018/texmf-config
   TEXMFVAR (personal directory for variable and automatically generated data):
     ~/.texlive2018/texmf-var
   TEXMFCONFIG (personal directory for local config):
     ~/.texlive2018/texmf-config
   TEXMFHOME (directory for user-specific files):
     ~/texmf

 <O> options:
   [ ] use letter size instead of A4 by default
   [X] allow execution of restricted list of programs via \write18
   [X] create all format files
   [X] install macro/font doc tree
   [X] install macro/font source tree
   [ ] create symlinks to standard directories

 <V> set up for portable installation

Actions:
 <I> start installation to hard disk
 <P> save installation profile to 'texlive.profile' and exit
 <H> help
 <Q> quit

Enter command:
オプション等を見て問題なければ I を入力してインストールを開始する。
おそらく既定のままで大丈夫。
さてここからは長いのでしばらく放置で大丈夫だろう。 今回は(前回の経験を活かし)寝る直前にインストーラを仕掛けた。 私はやればできる子なのだ(自画自賛)。
インストールが無事に完了すれば最後に以下のメッセージが表示される。
Welcome to TeX Live!


See /usr/local/texlive/2018/index.html for links to documentation.
The TeX Live web site (https://tug.org/texlive/) contains any updates and
corrections. TeX Live is a joint project of the TeX user groups around the
world; please consider supporting it by joining the group best for you. The
list of groups is available on the web at https://tug.org/usergroups.html.


Add /usr/local/texlive/2018/texmf-dist/doc/man to MANPATH.
Add /usr/local/texlive/2018/texmf-dist/doc/info to INFOPATH.
Most importantly, add /usr/local/texlive/2018/bin/x86_64-linux
to your PATH for current and future sessions.
Logfile: /usr/local/texlive/2018/install-tl.log
パス設定
パス設定については手動で行ってもいいのだが tlmgr コマンドを使うほうが簡単である。
$ sudo /usr/local/texlive/2018/bin/x86_64-linux/tlmgr path add
具体的には /usr/local/texlive/2018/ 以下の各種ファイルに対して /usr/local/bin/ 等へシンボリック・リンクを張っているらしい。
逆にリンクを削除する場合は
$ sudo tlmgr path remove
とすれば安全に処理できる。
環境変数の指定
TeX Live は1年毎にアップグレードされるし,その度にリンクを切った張ったは微妙に嫌だったので, /etc/profile.d/ ディレクトリに以下の内容を書いたファイル texlive-paths.sh を置いてみた(ファイル名は適当)。
# shellcheck shell=sh

# Expand $PATH to include the directory where TeX Live applications go.
texlive_path="/usr/local/texlive/2018"
texlive_bin_path="${texlive_path}/bin/x86_64-linux"
if [ -n "${PATH##*${texlive_bin_path}}" -a -n "${PATH##*${texlive_bin_path}:*}" ]; then
    export MANPATH=${MANPATH}:${texlive_path}/texmf-dist/doc/man
    export INFOPATH=${INFOPATH}:${texlive_path}/texmf-dist/doc/info
    export PATH=${PATH}:${texlive_bin_path}
fi
ログイン時にこのファイルが実行され環境変数がセットされる。 この方法の欠点は管理者権限での実行時にはパスが通らないため
$ sudo tlmgr version
sudo: tlmgr: コマンドが見つかりません
と言われてしまう点だろう。 普段使いなら問題ないんだけどね。 結局,シンボリック・リンクを張ったほうがいいみたい。
TeX Live を削除する際は tlmgr path remove でリンクを削除するのを忘れずに。
TeX Live をアップデートしようとしたが…
まずは参照するリポジトリを指定をしておこう。
$ sudo tlmgr option repository http://mirror.ctan.org/systems/texlive/tlnet
tlmgr: setting default package repository to http://mirror.ctan.org/systems/texlive/tlnet
このあと tlmgr でアップデートを行おうとしたが
$ sudo tlmgr update --self --all
TeX Live 2018 is frozen forever and will no
longer be updated.  This happens in preparation for a new release.

If you're interested in helping to pretest the new release (when
pretests are available), please read https://tug.org/texlive/pretest.html.
Otherwise, just wait, and the new release will be ready in due time.
tlmgr: package repository http://ctan.math.washington.edu/tex-archive/systems/texlive/tlnet (verified)
tlmgr: saving backups to /usr/local/texlive/2018/tlpkg/backups
と言われてしまった。
そうか。
夏には 2019 が出るから現行版の更新は既に凍結されているのか。
迂闊だった orz
各種設定変更
Windows と異なり,設定用の各コマンドは管理者権限(sudo)で起動する点に気をつける必要がある。
自動実行可能な外部コマンドの指定
まずは shell_escape_commands の値を変更する。
インストール直後は
$ kpsewhich -var-value=shell_escape_commands
bibtex,bibtex8,extractbb,gregorio,kpsewhich,makeindex,repstopdf,texosquery-jre8,
となっているので /usr/ocal/texlive/texmf-local/web2c/texmf.cnf ファイルを作成し以下を記述する。
shell_escape_commands = \
bibtex,bibtex8,pbibtex,jbibtex,\
extractbb,\
gregorio,\
kpsewhich,\
makeindex,mendex,\
repstopdf,epspdf,\
texosquery-jre8,\
これで shell_escape_commands の値が上書きされて
$ kpsewhich -var-value=shell_escape_commands
bibtex,bibtex8,pbibtex,jbibtex,extractbb,gregorio,kpsewhich,makeindex,mendex,repstopdf,epspdf,texosquery-jre8,
となる。
設定を変更したら mktexlsr で状態を更新しておくこと。
$ sudo mktexlsr
mktexlsr: Updating /usr/local/texlive/2018/texmf-config/ls-R...
mktexlsr: Updating /usr/local/texlive/2018/texmf-dist/ls-R...
mktexlsr: Updating /usr/local/texlive/2018/texmf-var/ls-R...
mktexlsr: Updating /usr/local/texlive/texmf-local/ls-R...
mktexlsr: Done.
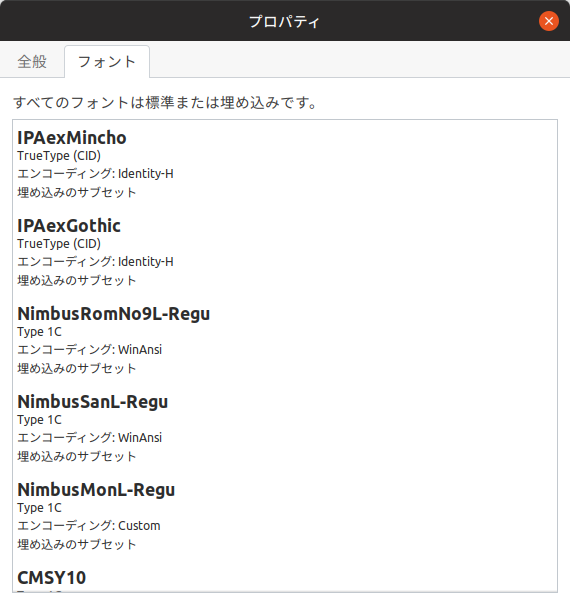
日本語フォントの埋め込み設定
日本語フォントの埋め込み設定はどうなってるんだろうと思ったが
$ kanji-config-updmap status
CURRENT family for ja: ipaex
Standby family : ipa
ありゃりゃ, IPA フォントしかないのか。 そりゃそうか。 Linux だもんな。
ちなみに日本語フォントの埋め込みを行わない(非推奨)場合は
$ kanji-config-updmap --user nofont
とする。
変更結果は ~/.texlive2018/ ディレクトリに反映される。
--user ではなく --sys オプションをつけてシステム全体の設定を変更する場合は管理者権限で起動すること1。
そういえば IPAex フォントの Ver.004.01 がリリースされている。 あの負の遺産のひとつ「元号の合成文字」である「令和(U+32FF “SQUARE ERA NAME REIWA”)」が追加されている。
とりあえず /usr/local/texlive/2018/texmf-dist/fonts/truetype/public/ipaex ディレクトリにあるフォントファイルを差し替えればいいかな。
たぶん 2019 かその次の 2020 あたりで正式にアップデートされるだろう。
その他フォントの設定については以下の拙文を参照のこと。
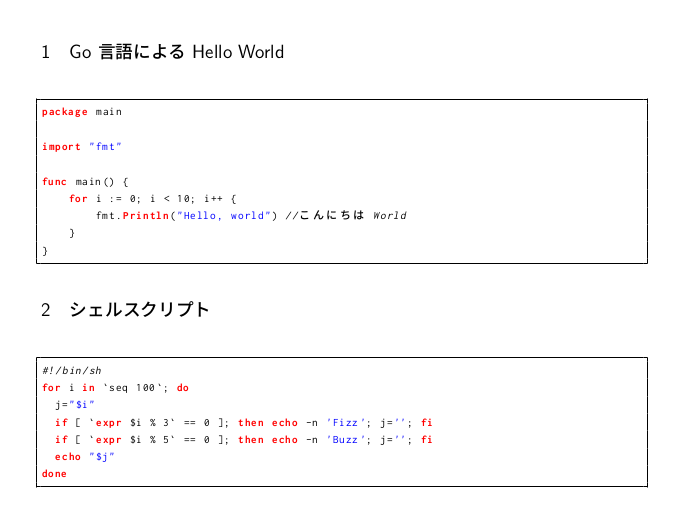
試しに何かタイプセットしてみる
ちうわけでいつものあの文書ですね。 20世紀な内容でゴメン。
$ latexmk charset.tex
...
Latexmk: All targets (charset.pdf charset.dvi) are up-to-date
よし。 ちゃんと動いた。 Lunux 環境でも問題なさそうだな。 ついでに PDF/A への変換もやっておこう。
$ ps2pdf14 -dPDFA -dPDFACompatibilityPolicy=1 -sProcessColorModel=DeviceCMYK charset.pdf charset-pdfa.pdf
これもちゃんと動いた。 フォントも正しく埋め込まれているようだ。
もうひとつ, $\mathrm{Lua\LaTeX}$ で以下のタイプセットも試してみる。
結果はこんな感じ。
よーし,うむうむ,よーし。
ブックマーク
参考図書

- [改訂第8版]LaTeX2ε美文書作成入門
- 奥村晴彦 (著), 黒木裕介 (著)
- 技術評論社 2020-11-14
- 大型本
- 4297117126 (ASIN), 9784297117122 (EAN), 4297117126 (ISBN)
- 評価
[Comment] 2020年末に第8版が出てたのに気付かなかったよ。可能なら紙の本も買って常に側に置いておくのが吉。版元には PDF 版もある。
-
kanji-config-updmap-sysコマンドでも同様。つかkanji-config-updmap-sysコマンドは内部でkanji-config-updmap --sysを起動しているだけなんだけど。 ↩︎