改めて TeX Live を Ubuntu に(APT を使わずに)導入する

6月にパソコンを買い換えてから新しいマシンには $\mathrm{\TeX}$ 環境を入れてなかったのだが,先日『LaTeX2ε美文書作成入門』第8版の読書感想文を書いたばかりなので,調子に乗って TeX Live 2021 を入れてしまおうと思い立った。
『LaTeX2ε美文書作成入門』の付録Aには
あらかじめ/usr/local/texliveというディレクトリを作成し,インストールする人の権限で書き込めるようにしておくのが簡単です
とか書かれてあって「やっぱそーなのか」と納得してしまった。 激しくダサい気がするがしょうがないか。 まぁ,今回は個人パソコンなので素直に
$ cd /usr/local/
$ sudo mkdir texlive
$ sudo chown -R username:username texlive
としてしおう。
サーバ機などでは,インストール完了後にオーナーを root に書き戻し
$ cd /usr/local
$ sudo chown -R root:root texlive
$ cd texlive/2021/bin/x86_64-linux/
$ sudo ./tlmgr path add
と /usr/local/bin/ 等パスの通ったディレクトリへシンボリック・リンクを張っておけば複数ユーザで共有できるようになる。
アップグレード等で元に戻す場合は
$ sudo tlmgr path remove
$ cd /usr/local/
$ sudo chown -R username:username texlive
...
という感じに,いったんシンボリック・リンクを削除してから諸々の作業を行うといいだろう。
OpenPGP 公開鍵を取ってくる
TeX Live のサイトでは検証用に OpenPGP 公開鍵を公開している。 これを取ってきて自分の鍵束にインポートしてしまおう。
$ gpg --fetch-key http://www.tug.org/texlive/files/texlive.asc
gpg: 鍵を'http://www.tug.org/texlive/files/texlive.asc'から要求
gpg: 鍵0D5E5D9106BAB6BC: 公開鍵"TeX Live Distribution <tex-live@tug.org>"をインポートしました
gpg: 処理数の合計: 1
gpg:               インポート: 1

$ gpg --list-keys 0D5E5D9106BAB6BC
pub   rsa2048 2016-03-19 [SC]
      C78B82D8C79512F79CC0D7C80D5E5D9106BAB6BC
uid           [  不明  ] TeX Live Distribution <tex-live@tug.org>
sub   rsa2048 2016-03-19 [E]
sub   rsa2048 2016-03-19 [S] [有効期限: 2022-07-27]
これはアレだな。 TeX Live がアップグレードされるたびに更新しろってことだな。
インストーラのダウンロードと検証
では続きを。
$ curl -L "https://mirror.ctan.org/systems/texlive/tlnet/install-tl-unx.tar.gz" -O
$ curl -L "https://mirror.ctan.org/systems/texlive/tlnet/install-tl-unx.tar.gz.sha512" -O
$ curl -L "https://mirror.ctan.org/systems/texlive/tlnet/install-tl-unx.tar.gz.sha512.asc" -O
$ gpg -d install-tl-unx.tar.gz.sha512.asc
gpg: 署名されたデータが'install-tl-unx.tar.gz.sha512'にあると想定します
gpg: 2021年09月08日 08時53分40秒 JSTに施された署名
gpg:                RSA鍵4CE1877E19438C70を使用
gpg: "TeX Live Distribution <tex-live@tug.org>"からの正しい署名 [不明の]
gpg: *警告*: この鍵は信用できる署名で証明されていません!
gpg:          この署名が所有者のものかどうかの検証手段がありません。
主鍵フィンガープリント: C78B 82D8 C795 12F7 9CC0  D7C8 0D5E 5D91 06BA B6BC
     副鍵フィンガープリント: D8F2 F860 57A8 57E4 2A88  106A 4CE1 877E 1943 8C70

$ sha512sum -c install-tl-unx.tar.gz.sha512
install-tl-unx.tar.gz: OK
なんちう回りくどい1。
普通にダウンロードファイルに署名すりゃいいぢゃん orz
ちなみに拙作の gnkf を使っても
$ gnkf hash -a SHA-512 -c install-tl-unx.tar.gz.sha512
install-tl-unx.tar.gz: OK
てな感じで検証できる。
sha512sum コマンドがない環境でどうぞ。
宣伝でした(笑)
よーやくインストール開始
$ tar xvf install-tl-unx.tar.gz
$ cd install-tl-20210908/
$ ./install-tl
リポジトリを指定する必要はないみたい。 適当に近場を探してくれてるようだ。
======================> TeX Live installation procedure <=====================

======>   Letters/digits in <angle brackets> indicate   <=======
======>   menu items for actions or customizations      <=======
= help>   https://tug.org/texlive/doc/install-tl.html   <=======

 Detected platform: GNU/Linux on x86_64

 <B> set binary platforms: 1 out of 16

 <S> set installation scheme: scheme-full

 <C> set installation collections:
     40 collections out of 41, disk space required: 7135 MB

 <D> set directories:
   TEXDIR (the main TeX directory):
     /usr/local/texlive/2021
   TEXMFLOCAL (directory for site-wide local files):
     /usr/local/texlive/texmf-local
   TEXMFSYSVAR (directory for variable and automatically generated data):
     /usr/local/texlive/2021/texmf-var
   TEXMFSYSCONFIG (directory for local config):
     /usr/local/texlive/2021/texmf-config
   TEXMFVAR (personal directory for variable and automatically generated data):
     ~/.texlive2021/texmf-var
   TEXMFCONFIG (personal directory for local config):
     ~/.texlive2021/texmf-config
   TEXMFHOME (directory for user-specific files):
     ~/texmf

 <O> options:
   [ ] use letter size instead of A4 by default
   [X] allow execution of restricted list of programs via \write18
   [X] create all format files
   [X] install macro/font doc tree
   [X] install macro/font source tree
   [ ] create symlinks to standard directories

 <V> set up for portable installation

Actions:
 <I> start installation to hard disk
 <P> save installation profile to 'texlive.profile' and exit
 <Q> quit

Enter command:
必要に応じて設定を変えて(既定のままでも無問題)問題なければ I を入力してインストールを開始する。
私の環境では1時間近くかかった。
お茶菓子を用意しておくか(笑)
環境変数については ~/.profile ファイルに
# Expand $PATH to include the directory where TeX Live applications go.
texlive_path="/usr/local/texlive/2021"
texlive_bin_path="${texlive_path}/bin/x86_64-linux"
if [ -d "$texlive_path" -a -n "${PATH##*${texlive_bin_path}}" -a -n "${PATH##*${texlive_bin_path}:*}" ]; then
  export PATH="$PATH:$texlive_bin_path"
fi
unset texlive_path texlive_bin_path
と追記しておけばいいかな。 一応,動作確認しておく。
$ lualatex -v
This is LuaHBTeX, Version 1.13.2 (TeX Live 2021)

Execute  'luahbtex --credits'  for credits and version details.

There is NO warranty. Redistribution of this software is covered by
the terms of the GNU General Public License, version 2 or (at your option)
any later version. For more information about these matters, see the file
named COPYING and the LuaTeX source.

LuaTeX is Copyright 2021 Taco Hoekwater and the LuaTeX Team.
マニュアルに関しては texdoc コマンドを使って
$ texdoc luatex
などとすれば対応する PDF ファイルが開く。 便利!
自動実行可能な外部コマンドの指定
とりあえず shell_escape_commands の値を変更しておく。
インストール直後は
$ kpsewhich -var-value=shell_escape_commands
bibtex,bibtex8,extractbb,gregorio,kpsewhich,makeindex,repstopdf,texosquery-jre8,
となっているので /usr/ocal/texlive/texmf-local/web2c/texmf.cnf ファイルを作成し以下を記述する。
shell_escape_commands = \
bibtex,bibtex8,pbibtex,jbibtex,\
extractbb,\
gregorio,\
kpsewhich,\
makeindex,mendex,\
repstopdf,epspdf,\
texosquery-jre8,\
これで shell_escape_commands の値が上書きされて
$ kpsewhich -var-value=shell_escape_commands
bibtex,bibtex8,pbibtex,jbibtex,extractbb,gregorio,kpsewhich,makeindex,mendex,repstopdf,epspdf,texosquery-jre8,
となる。
設定を変更したら mktexlsr で状態を更新しておくこと。
$ mktexlsr
mktexlsr: Updating /usr/local/texlive/2021/texmf-config/ls-R...
mktexlsr: Updating /usr/local/texlive/2021/texmf-dist/ls-R...
mktexlsr: Updating /usr/local/texlive/2021/texmf-var/ls-R...
mktexlsr: Updating /usr/local/texlive/texmf-local/ls-R...
mktexlsr: Done.
LuaLaTeX でなんか出力してみる
そうだ。 プログラムコードを出してみよう。
その前に listings パッケージで Go コードの syntax highlight が効くよう listings-golang を取ってくる。
$ cd /usr/local/texlive/texmf-local/tex/latex/
$ git clone git@github.com:julienc91/listings-golang.git
$ mktexlsr
そうそう。 $\mathrm{Lua\LaTeX}$ を使うならフォントキャッシュも念の為にアップデートしておくか。
$ luaotfload-tool -fu
用意したテキストはこんな感じ。
\documentclass{jlreq}
\usepackage[jis2004,deluxe]{luatexja-preset} % Japanese fonts
\setmonofont[AutoFakeSlant,BoldItalicFeatures={FakeSlant},Scale=MatchLowercase]{Inconsolatazi4} % use Inconsolata

\usepackage{graphicx,xcolor}
% \usepackage{listings}
\usepackage{listings-golang} % import this package after listings
\lstset{
    frame=single,
    basicstyle=\small\ttfamily,
    tabsize=4,
    commentstyle=\color{darkgray},
    keywordstyle=\color{brown}\bfseries,
    stringstyle=\color{blue},
    showstringspaces=false
}

\begin{document}

\section{Go 言語による Hello World}

\begin{lstlisting}[language=Golang]
package main

import "fmt"

func main() {
    for i := 0; i < 10; i++ {
        fmt.Println("Hello, world") //Hello, 世界
    }
}
\end{lstlisting}

\section{シェルスクリプト}

\begin{lstlisting}[language=sh]
#!/bin/sh
for i in `seq 100`; do
  j="$i"
  if [ `expr $i % 3` == 0 ]; then echo -n 'Fizz'; j=''; fi
  if [ `expr $i % 5` == 0 ]; then echo -n 'Buzz'; j=''; fi
  echo "$j"
done
\end{lstlisting}

\end{document}
へっへっへ。
jlreq ドキュメントクラスを使ってみたぜ。
これを処理した結果は以下の通り。
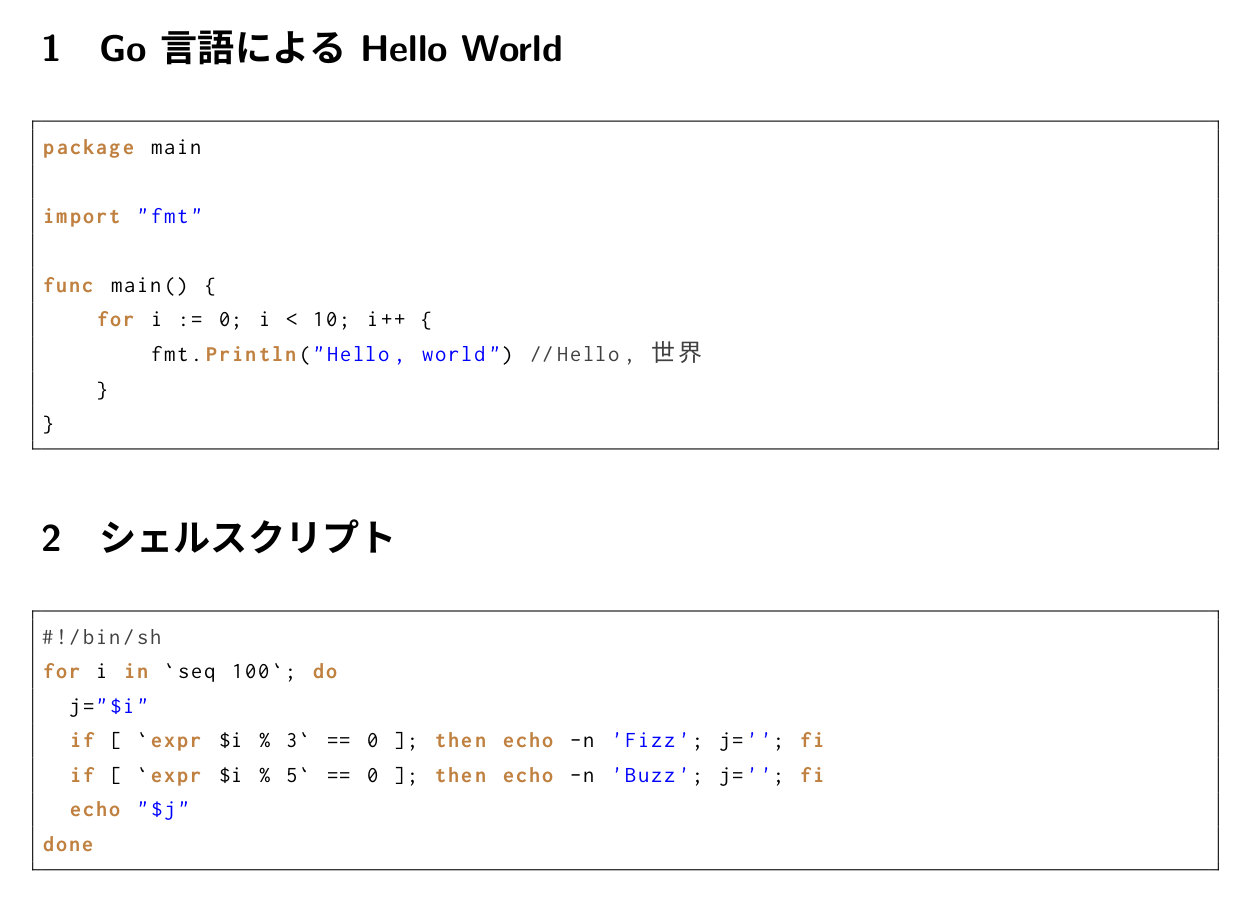
うんうん。 こんなもんだろう。
VS Code に LaTeX Workshop を導入する
『LaTeX2ε美文書作成入門』でも紹介されていた VS Code 用の LaTeX Workshop を導入してみた。
$ code --install-extension James-Yu.latex-workshop
たとえば,以下の内容で .latexmkrc ファイルを用意しておく。
#!/usr/bin/env perl

# LaTeX commands
$pdflatex            = 'lualatex %O -synctex=1 %S';
$latex               = 'uplatex %O -synctex=1 %S';
$latex_silent_switch = '-interaction=batchmode -c-style-errors';

# bibTeX commands
$bibtex    = 'upbibtex %O %B';
$biber     = 'biber %O --bblencoding=utf8 -u -U --output_safechars %B';
$makeindex = 'mendex %O -o %D %S';

# Device Driver
$dvipdf = 'dvipdfmx %O -z9 -V 7 -o %D %S';
$dvips = 'dvips %O -z -f %S | convbkmk -u > %D';
$ps2pdf = 'ps2pdf14 -dPDFA -dPDFACompatibilityPolicy=1 -sProcessColorModel=DeviceCMYK %O %S %D';

# Typeset mode (generate a PDF)
$pdf_mode = 1; # 0: do not generate a pdf , 1: using $pdflatex , 2: using $ps2pdf , 3: using $dvipdf

# Other configuration
$pvc_view_file_via_temporary = 0;
$max_repeat                  = 5;
したら $\mathrm{\LaTeX}$ テキストを保存するたびに上の設定でタイプセットが自動実行されて PDF まで作ってしまうわけですよ。 めっさ便利。
ブックマーク
参考図書

- [改訂第8版]LaTeX2ε美文書作成入門
- 奥村晴彦 (著), 黒木裕介 (著)
- 技術評論社 2020-11-14
- 大型本
- 4297117126 (ASIN), 9784297117122 (EAN), 4297117126 (ISBN)
- 評価
[Comment] 2020年末に第8版が出てたのに気付かなかったよ。可能なら紙の本も買って常に側に置いておくのが吉。版元には PDF 版もある。
-
電子署名の検証で「
*警告*: この鍵は信用できる署名で証明されていません!」と表示されているが,気にしなくてよい。その前の「"TeX Live Distribution <tex-live@tug.org>"からの正しい署名」が表示されていればOK。警告が出るのはインポートした公開鍵に自鍵で署名したり有効度を設定したりしてないからだが,直接手渡しされた鍵でもないのに安易に信用するのは危険であると言っておこう。もちろん何らかの手段で鍵と所有者が確定できるのであれば署名するなり有効度を設定するなりすればよい。 ↩︎